Table of Contents
RIP Configuration Procedures
RIP Basic Configuration
There are two basic configuration steps for RIP:
- Activate RIP routing process
- Enable RIP on the interface
To activate RIP routing process, use the following command in global configuration mode
(config)#router rip
(config-router)#
Then, to enable RIP on the interface, use the following command in RIP configuration mode.
(config-router)#network <network-address>
<network-address> : Classfull Network address
Note that RIP is enabled on a per-interface basis, but the configuration does not specify the interface. In Cisco routers, the concept of configuration is to enable RIP on interfaces with IP addresses in the range included in the network address specified by the network command. Also, the network address you specify is a classful network address. In classless addressing environments, such as subnetting or summarization, it may not be possible to specify in detail which interfaces to enable RIP on.
An interface with RIP enabled will perform the following behavior.
- Send and receive RIP packets on the interface
- Register the network address of the enabled interface as a RIP route in the RIP database.
RIP packets are periodically sent as broadcast or multicast from the RIP enabled interface. Then it receives the RIP packets. To receive multicast packets for RIPv2, the interface joins the multicast group of 224.0.0.9.
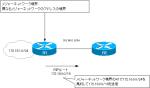
In addition, the network address of the RIP-enabled interface is registered in the RIP database as a RIP route so that it can be advertised to other routers. The route information advertised by RIP is not the contents of the routing table, but the route information in the RIP database. An example of the RIP configuration is shown below.

“network 10.0.0.0” is a command to enable RIP on an interface with an IP address beginning with “10”. In other words, enable RIP on Fa0/1. Can only be specified in classful. If you enter the command “network 10.1.1.0”, it will automatically be replaced by “network 10.0.0.0”.
Then, register Fa0/1’s network address “10.1.1.0/24” in the RIP database. RIP packets sent from the interface will now include the route information of 10.1.1.0/24.
And “network 192.168.1.0” is the command to enable RIP on the interface with IP address starting with “192.168.1”, i.e. Fa0/0. The network address “192.168.1.0/24” of Fa0/0 will be registered in the RIP database, and the route information of the RIP packets to be sent will include 192.168.1.0/24.
Configure RIP version
There are two versions of RIP: v1 and v2. When RIP is enabled with the network command, the default RIP version for that interface is as follows
Send : v1
Receive : v1/v2
Since the version of RIP packets to be sent is v1, the default is to operate with v1. To change the version, use the following command in RIP configuration mode.
(config)#router rip
(config-router)#version 2
It is unlikely that you would dare to use RIPv1, so you should always consider this configuration to be included.
Disable auto-summary
RIP automatically summarize and advertises route information by default. To disable auto summary, use the following command in RIP configuration mode.
(config)#router rip
(config-router)#no auto-summary
It is also unlikely that you will use auto-summary, so consider including the no auto-summary command.
Related article
auto-summary is explained in the following article.
Disable split-horizon
To disable split-horizon, use the following command in interface configuration mode.
(config)#interface <interface-name>
(config-if)#no ip split-horizon
<interface-name> : interface name
Related article

passive-interface
RIP packets only need to be sent and received between RIP routers; there is no need to send RIP packets to hosts such as PCs or servers. Specify passive-interface for interfaces that do not need to send RIP packets.
(config)#router rip
(config-router)#passive-interface <interface>
<interface> : interface name to be a passive-interface
Related article
For more information about passive-interface, please see the following article.
Change RIP timers
To change the value of the RIP timer from the default, use the following command in the RIP routing process
(config)#router rip
(config-router)#timers basic <update> <invalid> <holddown> <flush>
<update> : Update timer
<invalid> : Invalid timer
<holddown> : Hold down timer
<flush> : Flush timer
If you change the timer on only one router, it will be inconsistent with the timer values on other routers. Please change the timer on all the related routers.
Related article

Verify RIP behavior
The following table summarizes the commands for verifying the behavior of RIP.
| show command | Summary |
|---|---|
| #show ip portocols | Displays information such as RIP enabled interfaces and RIP timers. |
| #show ip rip database | Displays the RIP route information to be sent and received. |
| #show ip route rip | Displays only RIP routes in the routing table. |
| #debug ip rip | Real-time verification of RIP route information being sent and received. |
Related article
Please also see the following article for an example of configuring RIP on a Cisco router.
IP Routing Basic
- Router – The central device that performs routing
- Dividing Network with router
- Layer3 Switch Overview
- Measuring the distance to the destination network -Administrative Distance and Metric
- Equal Cost Multi Path Load Balancing
- Cisco Static Route Configuration
- Example of Cisco Static Route Configuration Step by Step
- RIP Split horizon
- RIP Timers
- RIP Route Poisoning – Quickly remove unnecessary route information
- Cisco RIP Basic Configuration and Verification Commands
- Cisco RIP Configuration Example
- Generating a default route in RIP – Redistribution of static route
- Passive-Interface ~Stops Routing Protocols from Sending Packets
- Default Gateway Redundancy Overview
- How the Cisco HSRP works
- Configuring and Verifying Cisco HSRP
- How VRRP works
- Configuring and Verifying commands for VRRP [Cisco]
