Table of Contents
Static Route Configuration
The procedure for configuring a static route is as follows.
Clarify the remote network for each router.
The important thing in configuring a static route is to clarify the remote network for each router. If the remote network that should be registered in a static route is not clear, there is a large possibility of omission or mistake in the configuration.
And there is no point in configuring static routes on only one router. When configuring routing with static routes, all the routers involved must be correctly configured with static routes.
Note that it is OK to aggregate remote networks instead of registering them one by one.
Use the ip route command to register route information for remote networks without omission.
After clarifying the remote network, use the ip route command in global configuration mode to configure a static route. ip route command format is as follows
(config)#ip route <network> <subnetmask> <next-hop> [<interface>] [<AD>]
<network> : network address
<subnetmask> : subnetmask
<next-hop> : next hop address
<interface> : output interface
<AD> : administrative distance
The next hop address is, in principle, the IP address of the next router in the same network. Also, the output interface is specified only when it is a point-to-point interface. Multi-access interfaces such as Ethernet do not allow address resolution, so packets cannot be output properly.
The administrative distance, if omitted, is the default of 1. By increasing the administrative distance, it is possible to configure a static route as a backup route. A static route configured as a backup route by configuring a larger administrative distance is called a floating static route.
Important for the CCNA exam
Be sure to memorize the static route configuration commands. Configuring a floating static that specifies an administrative distance is also very important.
Static Route Verification
To verify the static routes, use the show ip route command to display the routing table. show ip route static will show only the static routes from the routing table.
show ip route staticの出力例
R1#show ip route static
S    192.168.23.0/24 [1/0] via 192.168.12.2
S    192.168.3.0/24 [1/0] via 192.168.12.2
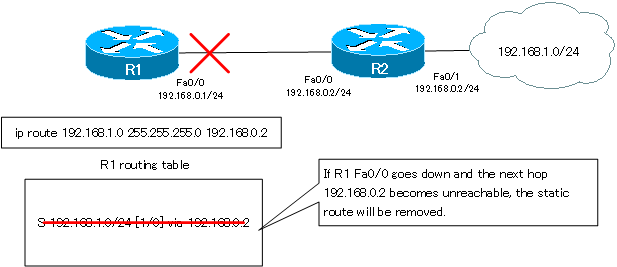
Note that the static route will be removed from the routing table if the next hop cannot be reached. In the following figure, if R1 Fa0/0 goes down, the static route will be removed from the routing table because the next hop cannot be reached.
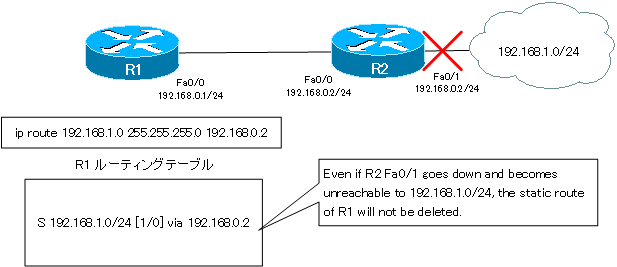
However, even if R2 Fa0/1 goes down and the 192.168.1.0/24 network itself becomes unreachable, the static route for R1 will still remain.
Remove Static Route Configuration
R1#show ip route static
S    192.168.23.0/24 [1/0] via 192.168.12.2
S    192.168.3.0/24 [1/0] via 192.168.12.2
R1#show run | include ip route
ip route 192.168.3.0 255.255.255.0 192.168.12.2
ip route 192.168.23.0 255.255.255.0 192.168.12.2
Delete the static route configuration for 192.168.3.0/24. The ip route command for the static route is configured in global configuration mode, so enter “no ip route 192.168.3.0 255.255.255.0 192.168.12.2” in global configuration mode. Then the line “ip route 192.168.3.0 255.255.255.0 192.168.12.2” will be removed from the running-config and also from the routing table.
R1#configure terminal
Enter configuration commands, one per line.  End with CNTL/Z.
R1(config)#no ip route 192.168.3.0 255.255.255.0 192.168.12.2
R1(config)#end
R1#show running-config | include ip route
ip route 192.168.23.0 255.255.255.0 192.168.12.2
R1#show ip route static
S    192.168.23.0/24 [1/0] via 192.168.12.2
Configure the default route as a static route
To register the default route as a static route, configure it in global configuration mode as follows
(config)#ip route 0.0.0.0 0.0.0.0 <next-hop>
All you need to do is to set both the network address and subnet mask to “0.0.0.0” in the normal static route configuration command.
And if we register the default route in the routing table of the Cisco router, the routing table will look like the following example.
R2#show ip route
Codes: C - connected, S - static, R - RIP, M - mobile, B - BGP
       D - EIGRP, EX - EIGRP external, O - OSPF, IA - OSPF inter area
       N1 - OSPF NSSA external type 1, N2 - OSPF NSSA external type 2
       E1 - OSPF external type 1, E2 - OSPF external type 2
       i - IS-IS, su - IS-IS summary, L1 - IS-IS level-1, L2 - IS-IS level-2
       ia - IS-IS inter area, * - candidate default, U - per-user static route
       o - ODR, P - periodic downloaded static route

Gateway of last resort is 200.0.0.2 to network 0.0.0.0

C    192.168.12.0/24 is directly connected, Ethernet0/0
     200.0.0.0/24 is variably subnetted, 2 subnets, 2 masks
C       200.0.0.0/30 is directly connected, Serial1/0
C       200.0.0.2/32 is directly connected, Serial1/0
C    192.168.21.0/24 is directly connected, Ethernet0/1
     10.0.0.0/24 is subnetted, 2 subnets
O IA    10.3.3.0 [110/11] via 192.168.32.3, 00:00:06, Ethernet0/3
O IA    10.1.1.0 [110/20] via 192.168.21.1, 00:00:06, Ethernet0/1
                 [110/20] via 192.168.12.1, 00:00:08, Ethernet0/0
C    192.168.23.0/24 is directly connected, Ethernet0/2
C    192.168.32.0/24 is directly connected, Ethernet0/3
S*   0.0.0.0/0 [1/0] via 200.0.0.2
When a default route is registered in the routing table, “Gateway of last resort is 200.0.0.2 to network 0.0.0.0” is displayed at the top of the individual entry in the route information. This means that the default route is set at network address 0.0.0.0 and the next hop is 200.0.0.2.
Then, “*” will be added to the individual entries of the route information, such as “S* 0.0.0.0/0 [1/0] via 200.0.0.2”. The “*” indicates that the route information is to be used as the default route, and “*” will be automatically added to the route information of “0.0.0.0/0”.
IP Routing Basic
- Router – The central device that performs routing
- Dividing Network with router
- Layer3 Switch Overview
- Measuring the distance to the destination network -Administrative Distance and Metric
- Equal Cost Multi Path Load Balancing
- Cisco Static Route Configuration
- Example of Cisco Static Route Configuration Step by Step
- RIP Split horizon
- RIP Timers
- RIP Route Poisoning – Quickly remove unnecessary route information
- Cisco RIP Basic Configuration and Verification Commands
- Cisco RIP Configuration Example
- Generating a default route in RIP – Redistribution of static route
- Passive-Interface ~Stops Routing Protocols from Sending Packets
- Default Gateway Redundancy Overview
- How the Cisco HSRP works
- Configuring and Verifying Cisco HSRP
- How VRRP works
- Configuring and Verifying commands for VRRP [Cisco]