Table of Contents
Procedure for configuring a route-map
There are two procedures for configuring a route-map.
- Create a route-map
- Identify the purpose of the route-map and determine the target of the process and the content of the process
- Applying a route-map
- Apply the route-map you’ve created, depending on the purpose.
A route-map is completely useless just by creating it. Keep in mind that you must apply the route-map you create to your purposes. Depending on the purpose of the route-map, you may need to change your configuration. Make sure you are clear on the purpose of the route-map before configuring the route-map.
Create a route-map
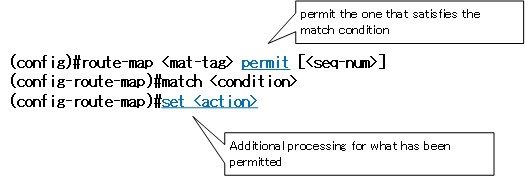
To create a route-map, use the route-map command in global configuration mode.
(config)#route-map <mat-tag> {permit | deny} [<seq-num>]
(config-route-map)#match <condition>
(config-route-map)#set <action>
<map-tag> : route-map name
permit | deny : Specify permit or deny. Meaning depends on the purpose of the route map.
<seq-num> : Sequence number. If omitted, “10
<condition> : Condition
<action> : Additional Processes
<map-tag> can be used to specify the name of the route-map. Preferably, the name should reflect the content of the route-map in a way that is easy to understand. It should be followed by either “permit” or “deny”.
permit | deny
Note that the meanings of permit and deny will vary depending on the purpose of the route-map. For example, when used in PBR, permit means “policy-based routing” and deny means “normal routing instead of policy-based routing.” If you are applying a route map to a BGP neighbor, Permit means to permit a BGP route, and deny means to deny a BGP route.
You can omit “permit” or “deny” . If you omit it, it is automatically set to “permit”.
Match configuration
You can specify <condition> after the match to specify what to process. There are various <condition> that can be configured. You must specify an appropriate <condition> for your route-map purpose. For example, it does not make sense to associate a prefix-list with a match condition for a route-map used in PBR.
Match conditions are often associated with standard/extended ACLs and prefix-lists. To associate a standard/extended ACL, configure it as follows
(config-route-map)#match ip address <ACL-num> | <ACL-name>
<ACL-num> : ACL number
<ACL-name> : ACL name
To associate a prefix-list, configure it as follows
(config-route-map)#match ip address prefix-list <prefix-list-name>
<prefix-list-name> : prefix-list name
You can also configure multiple match conditions: a match followed by a horizontal line is an OR condition; a match followed by a vertical line becomes an AND condition.
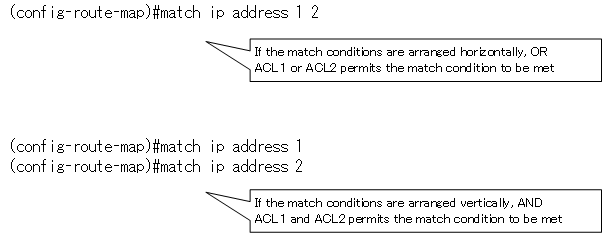
If you omit the “match” configuration, “all” will be processed. However, the meaning of “all” will differ depending on the purpose. For example, if you are using a route map in PBR, it is “all IP packets received by the router”; if you are applying a route map to a BGP neighbor, it is “all BGP routes”.
Set configuration.
Performs a “permit” or “deny” operation after on a target that meets the match criteria. It is the configuration of the set command that performs additional processing on the permitted processing target. There are many things you can configure with the set command, but they are useless if you don’t configure them appropriately for your purposes. It makes no sense at all to set the LOCAL_PREF of the BGP route in the set command of the route-map used by PBR.
Multiple Process Configurations
The route-map in three lines of command format is one of the processes of the route-map. The target of the process is decided by match, and the process content is decided by permit or deny and set. If you want to configure multiple processes, you can change <seq-num> and do the same thing. Processing is performed in the order of decreasing <seq-num>.
And note that there is an implicit deny in the route-map as well as in ACLs and prefix lists. There needs to be at least one sequence that is a permit.

The permit/deny of the route map and the permit/deny of ACLs etc. associated with match.
The permit/deny after <map-tag> and the permit/deny of ACLs, etc. that are associated with the route-map is another confusing part of the route-map.
The “permit/deny” of the ACLs and prefix list associated with the match means that the match condition is satisfied (permit) or not (deny).Then, targets that satisfy the match condition are processed by permit/deny of the root map after <map-tag>. If the target does not satisfy the match condition, the sequence is not processed and the next sequence is viewed.
Consider a simple route-map example “test” with route information as the target of the route-map process. We assume that the standard ACLs check the network address to identify the route information.
route-map test deny 10
 match ip address 1
route-map test permit 20
 match ip address 2
!
access-list 1 permit 192.168.1.0
access-list 2 deny 172.16.1.0
access-list 2 permit 172.16.2.0
Then consider the following five route information as an example
- 192.168.1.0/24
- 192.168.2.0/24
- 172.16.1.0/24
- 172.16.2.0/24
- 10.1.1.0/24
“192.168.1.0/24” satisfies the match condition because it is permitted by ACL1 in sequence 10. And since sequence 10 is deny, 192.168.1.0/24 is a deny operation.
“192.168.2.0/24” is not permitted in either ACL1 of sequence 10 or ACL2 of sequence 20. It is denied with an implicit deny.
“172.16.1.0/24” is denied on line 1 of ACL2 of sequence 20. the match condition is not satisfied. It will eventually be denied with an implicit deny.
“172.16.2.0/24” satisfies the match condition because it is permit in line 2 of ACL2 of sequence 20. Sequence 20 is a process of permit because sequence 20 is a permit.
“10.1.1.0/24” is denied by implicit deny because it is not permittable by either ACL1 in sequence 10 or ACL2 in sequence 20.

Applying a route-map
As mentioned at the beginning of this article, a route map is completely useless just by creating it. You need to apply it according to the purpose. The main commands to apply a route map are explained below.
Applying a route-map : PBR
To use the route map in PBR, enter the following command in the router’s interface configuration mode.
(config)#interface <interface-name>
(config-if)#ip policy route-map <map-tag>
<interface-name> : interface name
<map-tag> : route-map name
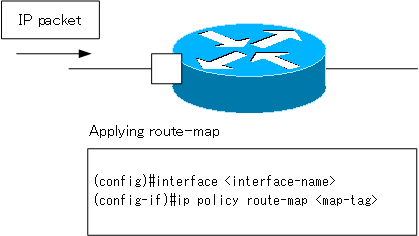
When you apply a route-map to perform PBR on IP packets generated by the router itself. enter the following command in global configuration mode.
(config)#ip policy route-map <map-tag>
<map-tag> : route-map name
Applying a route-map : NAT
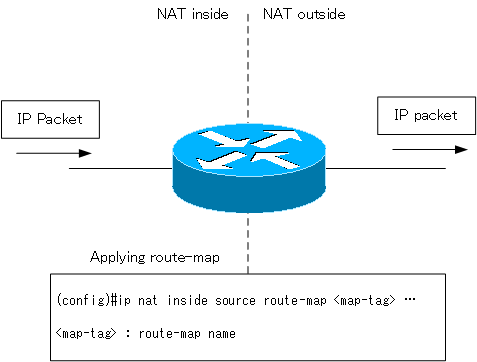
When you use a route-map to specify packets for NAT conversion, use the ip nat inside source command to apply the route-map.
(config)#ip nat inside source route-map <map-tag> …
<map-tag> : route-map name
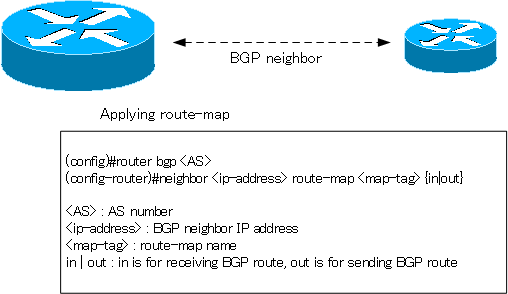
Applying a route-map : BGP neighbor
To filter or add attributes to BGP routes sent to or received from a specific BGP neighbor, apply a route map with the following command.
(config)#router bgp <AS>
(config-router)#neighbor <ip-address> route-map <map-tag> {in|out}
<AS> : AS number
<ip-address> : BGP neighbor IP address
<map-tag> : route-map name
in | out : in is for receiving BGP route, out is for sending BGP route
Applying a route-map : redistribute
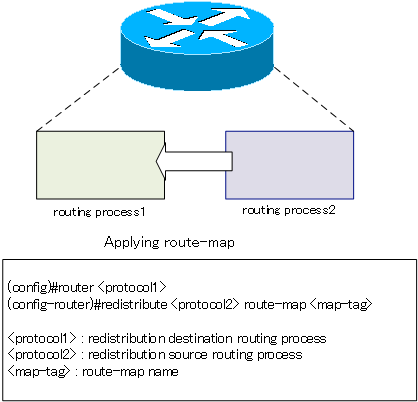
To use a route map when redistributing between routing processes, you can apply a route-map in the redistribute command.
(config)#router <protocol1>
(config-router)#redistribute <protocol2> route-map <map-tag>
<protocol1> : Redistribution destination routing process
<protocol2> : Redistribution source routing process
<map-tag> : route-map name
Advanced IP Routing
- Overview of Cisco Route-map
- Cisco Route-map Configuration
- GRE Tunnel Interface – Virtual Point-to-Point Connection
- GRE Tunnel Interface Configuration Example
- Overview of VRF/VRF-Lite – Virtually separating the router –
- Cisco VRF Configuration and Verification Commands
- Cisco Layer 3 VPN with VRF-Lite Configuration Example
- What Is FVRF(Front door VRF)?
- Point-to-point GRE Tunnel without FVRF
- Point-to-point GRE tunnel with FVRF (tunnel vrf command)
- IPSec VTI with FVRF
- IPSec VTI with FVRF Configuration Example
- DMVPN with FVRF
- DMVPN with FVRF Configuration Example Part1
- DMVPN with FVRF Configuration Example Part2