Table of Contents
Basic HSRP Configuration.
The basic configuration of HSRP is as follows
- Configuring HSRP groups and virtual IP address
- Configuring HSRP Priority
The commands for each procedure are explained in the following sections.
Configuring HSRP groups and virtual IP address
HSRP is configured in the interface configuration mode for the interface to which the PC or server is connected and which acts as the default gateway. First, configure the HSRP group and the IP address of the virtual router with the following commands.
(config)#interface <interface-name>
(config-if)#standby <group-num> ip <ip-address>
<interface-name> : Interface name
<group-num> : HSRP group number. 0~255
<ip-address> : IP address of virtual router
Note that the HSRP group number and the IP address of the virtual router must be configured the same on multiple routers. If the group number or the IP address of the virtual router is mismatched, it will not work correctly.
Configuring HSRP Priority
The default HSRP priority is 100. Therefore, by default, the active router is the router with the larger IP address. To explicitly determine the active router, specify the HSRP priority with the following command.
(config)#interface <interface-name>
(config-if)#standby <group-num> priority <priority>
<interface-name> : interface name
<group-num> : HSRP group number. 0~255
<priority> : priority value. 0~255
HSRP Other Configurations
In addition to the basic configuration, the following additional configurations will be explained.
- Interface tracking
- Authentication
- HSRP timers
Interface tracking
To configure HSRP interface tracking, enter the following command in interface configuration mode for the interface in which HSRP is enabled.
(config)#interface <interface-name>
(config-if)#standby <group-num> track <interface> [<decrement>]
(config-if)#standby <group-num> preempt
<interface-name> : interface name
<group-num> : HSRP group number. 0~255
<interface> : Interface to be monitored
<decrement> : Value to decrement priority. default 10
Remember to also enable preempt for tracking.
Authentication
HSRP authentication verifies that the router communicating via HSRP is a legitimate router. The router is considered to be a legitimate router if the same password is configured on it. HSRP authentication can be performed either by a plaintext password or by an MD5 checksum of the password.
To configure plaintext password authentication, use the following command.
(config)#interface <interface-name>
(config-if)#standby <group-num> authentication text <password>
<interface-name> : interface name
<group-num> : HSRP group number. 0~255
<password> : password
For MD5 authentication, use the following command.
(config)#interface <interface-name>
(config-if)#standby <group-num> authentication md5 key-string <password>
<interface-name> : interface name
<group-num> : HSRP group number. 0~255
<password> : password
HSRP timers
The HSRP timer is the configuration of the interval at which Hello messages are sent and the hold timer at which they are considered to be down. use the following command in HSRP-enabled interface configuration mode.
(config)#interface <interface-name>
(config-if)#standby <group-num> timers <hello-time> <hold-time>
<interface-name> : interface name
<hello-time> : Hello message period. default 3 sec
<hold-time> : hold time. default 10 sec
The hold time should be about three times the Hello interval.
HSRP Verification Commands
The following commands are mainly used to verify the operation of HSRP.
| show command | Contents |
|---|---|
|
#show standby brief | Verify the summary information such as active router, standby router, and virtual IP address for the HSPR group. |
|
#show standby | In addition to the information you can verify with show standby brief, verify the detailed information including HSRP timers and virtual MAC addresses. |
HSRP Configuration Example
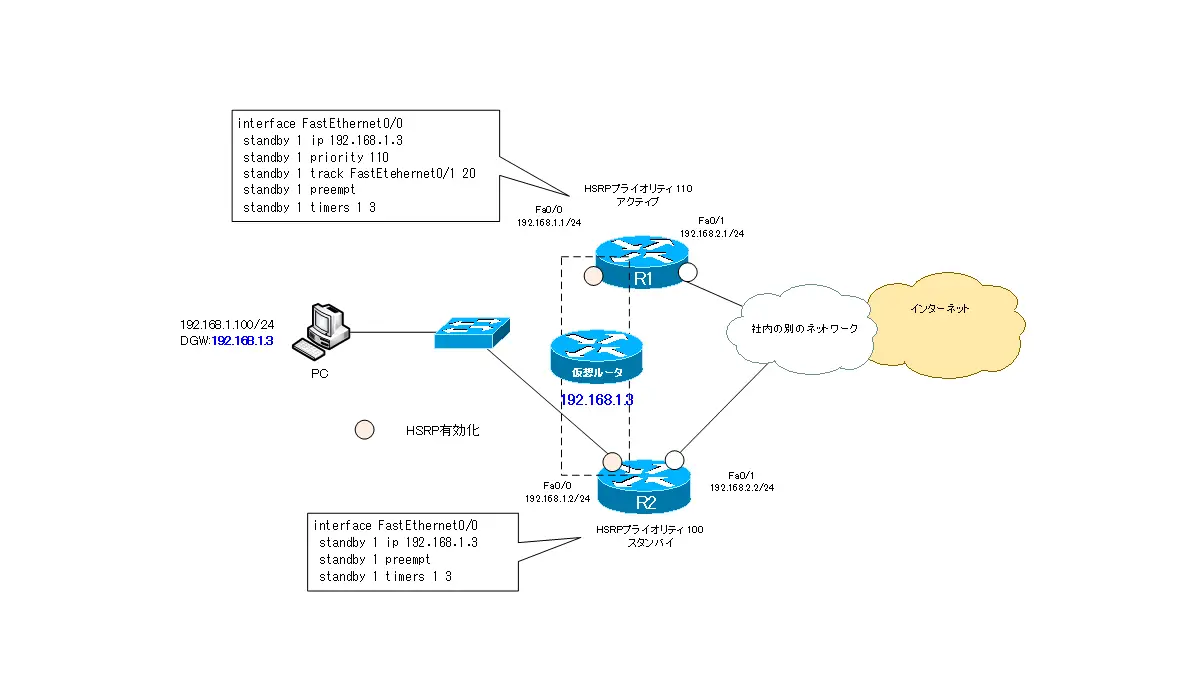
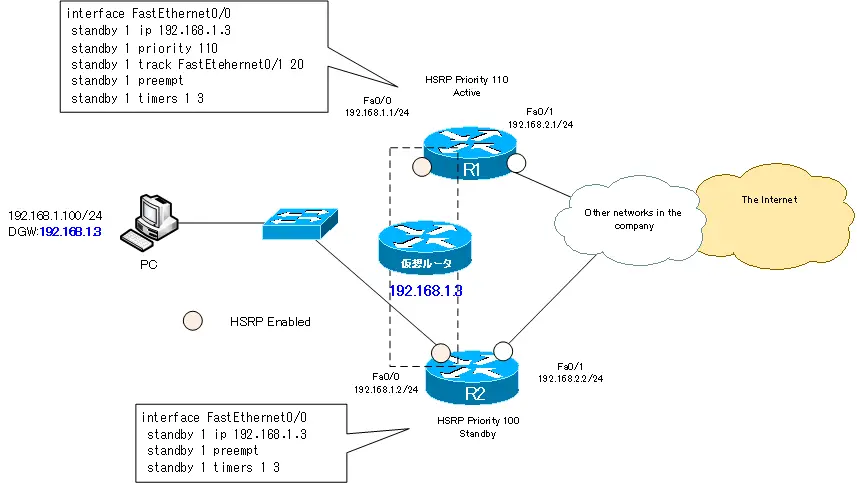
Use HSRP to make the default gateway redundant on R1/R2 in the following network diagram.
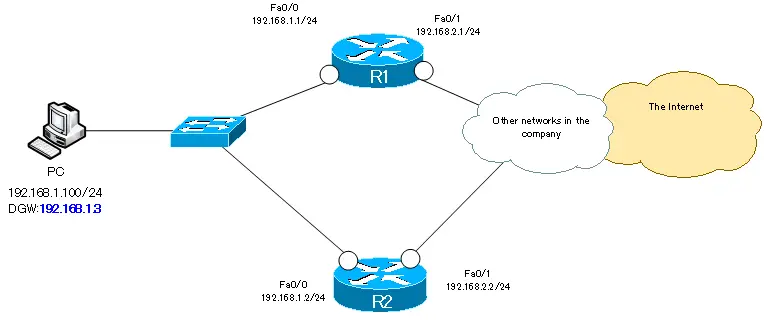
The conditions to be configured are summarized below.
- Specify 192.168.1.3 as the default gateway for the PC.
- Make R1 act as an active router
- When R1 Fa0/1 goes down, switch the active router to R2
- Switch active router in 3 seconds.
Configuration
Since the default gateway of the PC is configured as 192.168.1.3, we will use 192.168.1.3 as the IP address of the virtual router. To make R1 the active router, the priority is increased to 110, which is greater than the default.
In addition, monitor the status of R1 Fa0/1; if R1 Fa0/1 goes down, decrement the priority by 20 so that the active router will switch to R2. For tracking to work, the preempt configuration is also required.
To switch the active router in 3 seconds, the Hold Time should be configured to 3 seconds. Change the Hello interval to 1 second to match it.
R1
interface FastEthernet0/0
 standby 1 ip 192.168.1.3
 standby 1 priority 110
 standby 1 track FastEtehernet0/1 20
 standby 1 preempt
 standby 1 timers 1 3
R2
interface FastEthernet0/0
 standby 1 ip 192.168.1.3
 standby 1 preempt
 standby 1 timers 1 3
Verification
The output of the show standby brief command on R1 is as follows
R1
R1#show standby brief
                     P indicates configured to preempt.
                     |
Interface   Grp Prio P State    Active          Standby         Virtual IP
Fa0/0       1   110  P Active   local           192.168.1.2     192.168.1.3
You can see that R1 is the active router and R2 (192.168.1.2) is the standby router.
Also, the output of the show standby command is as follows
R1
R1#show standby
FastEthernet0/0 - Group 1
  State is Active
    2 state changes, last state change 00:06:00
  Virtual IP address is 192.168.1.3
  Active virtual MAC address is 0000.0c07.ac01
    Local virtual MAC address is 0000.0c07.ac01 (v1 default)
  Hello time 1 sec, hold time 3 sec
    Next hello sent in 0.364 secs
  Preemption enabled
  Active router is local
  Standby router is 192.168.1.2, priority 100 (expires in 2.236 sec)
  Priority 110 (configured 110)
    Track interface FastEthernet0/1 state Up decrement 20
  IP redundancy name is "hsrp-Fa0/0-1" (default)
The show standby command allows you to verify the status of the virtual MAC address, Hello time, hold time and tracking configurations.
Then, when you shutdown Fa0/1 on R1, the tracking will decrease the priority to 90 and R2 will switch to the new active router.
R1
R1(config)#interface FastEthernet 0/1
R1(config-if)#shutdown
R1(config-if)#do show standby
FastEthernet0/0 - Group 1
  State is Standby
    4 state changes, last state change 00:00:05
  Virtual IP address is 192.168.1.3
  Active virtual MAC address is 0000.0c07.ac01
    Local virtual MAC address is 0000.0c07.ac01 (v1 default)
  Hello time 1 sec, hold time 3 sec
    Next hello sent in 0.132 secs
  Preemption enabled
  Active router is 192.168.1.2, priority 100 (expires in 2.120 sec)
  Standby router is local
  Priority 90 (configured 110)
    Track interface FastEthernet0/1 state Down decrement 20
  IP redundancy name is "hsrp-Fa0/0-1" (default)
IP Routing Basic
- Router – The central device that performs routing
- Dividing Network with router
- Layer3 Switch Overview
- Measuring the distance to the destination network -Administrative Distance and Metric
- Equal Cost Multi Path Load Balancing
- Cisco Static Route Configuration
- Example of Cisco Static Route Configuration Step by Step
- RIP Split horizon
- RIP Timers
- RIP Route Poisoning – Quickly remove unnecessary route information
- Cisco RIP Basic Configuration and Verification Commands
- Cisco RIP Configuration Example
- Generating a default route in RIP – Redistribution of static route
- Passive-Interface ~Stops Routing Protocols from Sending Packets
- Default Gateway Redundancy Overview
- How the Cisco HSRP works
- Configuring and Verifying Cisco HSRP
- How VRRP works
- Configuring and Verifying commands for VRRP [Cisco]