Table of Contents
Multi-step Telnet Session Suspensions
You can also telnet in multiple steps, such as telnetting from one device to another, and then from there to another device. There’s a bit of a trick to suspend the session and return to the CLI on any device. You can control the number of times you press [Ctrl]+[Shift]+[6] to suspend a session. The rules are as follows.
Number of times to press [Ctrl]+[Shift]+[6].
- Odd – return to the originating device’s CLI
- Even – one by one from the originating device back to the previous device’s CLI
Multi-step Telnet Session Suspensions Example
Specifically, consider the case of multi-step telnetting from R1 to R4, as shown in the following figure.
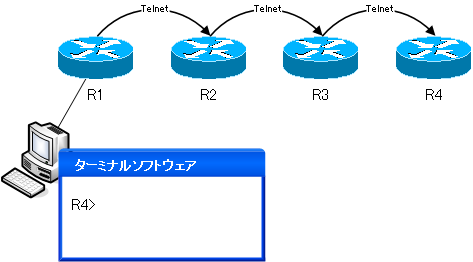
Connect the console to R1 and telnet from R1 to R2. Telnet from R2 to R3 and then from R3 to R4 and the terminal software will show the CLI for R4.
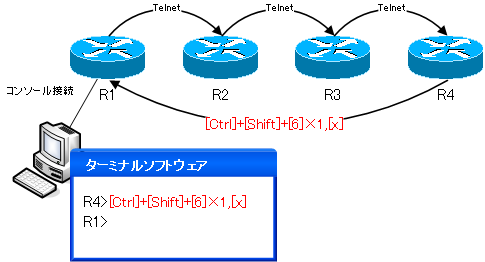
Press [Ctrl]+[Shift]+[6] once.
Now, press [Ctrl]+[Shift]+[6] once, and then press [x] to return to the originating CLI of R1.
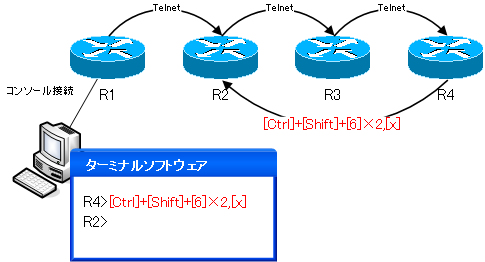
Press [Ctrl]+[Shift]+[6] twice.
Press [Ctrl]+[Shift]+[6] twice, then press the [x] key to return to the CLI of R2 before the originating R1.
Press [Ctrl]+[Shift]+[6] three times.
Press [Ctrl]+[Shift]+[6] three times, then press the [x] key to return to the originating CLI of R1.

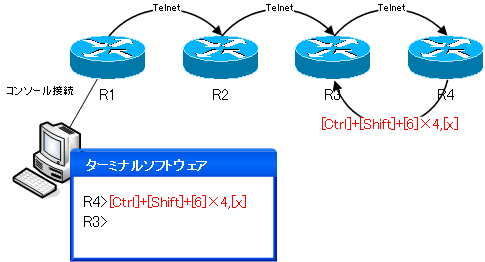
Press [Ctrl]+[Shift]+[6] four times.
Press [Ctrl]+[Shift]+[6] four times, then press the [x] key to return to the CLI of the two previous R3s from the originating R1.
Cisco Basic
- Preparing for Cisco devices configuration
- Configuration files for Cisco devices
- The configuration steps for Cisco devices
- Basic knowledge of the Cisco CLI: Command types and modes
- Cisco device’s interface
- CLI help and completion
- The main error messages in CLI
- Cisco Deleting a configuration command
- default interface command -Initialize the interface settings-
- Entering commands in batches
- do command – Execute EXEC command from configuration mode –
- interface range command -Batch configuration of multiple interfaces-
- Filtering the display of the show command – displaying only the information you want to see –
- Cisco IOS Name Resolution Configuration
- terminal length command : configuration of the number of lines displayed in the command output
- debug command to verify real-time operation
- Automatically enter privileged EXEC mode upon CLI login
- Configure System Clock
- Saving and managing configuration files
- Version Management of Configuration Files ~archive command
- IOS File System Operations
- Managing Cisco Catalyst Switches :What it means to set an IP address on a switch.
- Remote management by VTY access (Telnet/SSH)
- terminal monitor command to display the log of Telnet/SSH login destination
- Multi-step Telnet Session Suspensions
- Set the minimum number of characters in the password [Cisco]
- Restrict login attempts : login block-for command
- Cisco Initial Configuration Example
- CDP – What are the connected devices? –
- Password recovery for Cisco routers
- Password Recovery for Catalyst Switches
