
Table of Contents
What is VTY Access?
You can manage Cisco routers and Catalyst switches with a console connection, but this requires a direct console cable connection to the device you want to manage. Console connections are not an efficient way to manage remote devices. An efficient way to manage remote devices is to use VTY access, which is CLI-based remote access using Telnet or SSH.
Telnet uses TCP port number 23. Telnet is a simple protocol and does not encrypt communications. Therefore, there is a risk that if the communication is eavesdropped, the user ID/password account information can be compromised to allow a malicious user to login. On the other hand, SSH uses TCP port 22. It uses public key cryptography, which means that even if someone eavesdrops on SSH, there is no risk of account information being compromised.
To accept remote Telnet or SSH VTY access on Cisco routers and Catalyst switches, the VTY line must be configured in advance. The protocol to be accepted on the VTY line is specified by the transport input command.
Router(config)#line vty 0 4
Router(config-line)#transport input ?
  all      All protocols
  lapb-ta  LAPB Terminal Adapter
  lat      DEC LAT protocol
  none     No protocols
  pad      X.3 PAD
  rlogin   Unix rlogin protocol
  ssh      TCP/IP SSH protocol
  telnet   TCP/IP Telnet protocol
  udptn    UDPTN async via UDP protocol
  v120     Async over ISDN
You can specify a variety of protocols, but generally you should use telnet or ssh. If you want to accept only ssh, use transport input ssh. It is also possible to specify more than one protocol.
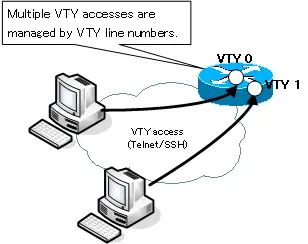
When you access a VTY , you are logging into a VTY line, a VTY line is a virtual interface that accepts VTY accesses and the line number is five, from 0 to 4 by default. The current IOS can be further extended to handle more VTY lines; a single device can accept multiple VTY accesses, and the assignment of a VTY line number uses the VTY line number available at the time the VTY access is received. When the line that sets up the authentication and the line that doesn’t set up the authentication are mixed together, it is not desirable from the security point of view, so please set up the authentication properly to all VTY lines basically.
Configuring Telnet access
To accept VTY access from a remote user, you basically have to authenticate; in the case of Telnet access, you can authenticate with a password on the VTY line or with a username/password defined by the router.
The login command enables the authentication on the VTY line by using the password set on the VTY line.

If you have enabled password authentication on the VTY line with the login command, but have not set a password on the VTY line, you will not be able to authenticate and VTY access will be denied as follows.
Password required, but none set
And for more flexible authentication, you can enter the login local command on the VTY line. This will allow you to authenticate with the username and password defined on the router.

If you input the no login command on the VTY line, you can access to VTY by Telnet without authentication. However, it is not recommended for security reasons because if you know your router’s IP address, anyone can access to Telnet.
Configuring SSH access
To configure your router to accept SSH access, do the following
- Domain name and host name configuration.
- Generating a Public Key
- Enable SSH and authentication on VTY
- Configuring a user name and password
1.Domain name and host name configuration.
Configure the router with a unique domain name and host name to generate a public key to be used for encryption.
(config)#ip domain name <domain>
(config)#hostname <host>
<domain> : domain name
<host> : host name
2.Generating a Public Key
Generates a public key. When you enter the command, you are asked for the bit length of the public key you want to generate. Enter the appropriate key bit length.
(config)#crypto key generate rsa
The following is an example of output from the crypto key generate rsa command for public key generation.
R1(config)#crypto key generate rsa
The name for the keys will be: R1.n-study.com
Choose the size of the key modulus in the range of 360 to 2048 for your
  General Purpose Keys. Choosing a key modulus greater than 512 may take
  a few minutes.

How many bits in the modulus [512]: 1024
% Generating 1024 bit RSA keys, keys will be non-exportable...[OK]
3.Enable SSH and authentication on VTY
You can enable SSH on VTY. SSH is enabled by default by transport input all, so you don’t need to configure it.SSH requires username and password authentication. login local command to enable username and password authentication.
(config)#line vty 0 4
(config-line)#login local
(config-line)#transport input ssh
4.Configuring a user name and password
Configure the username/password for authentication.
(config)#username <user> password <password>
<user> : user name
<password> : password
Running Telnet from Cisco Router and Catalyst Switch
In addition to receiving Telnet access, Cisco routers and Catalyst switches can also telnet themselves to log in to other devices. To telnet to other devices, enter the following commands in user EXEC or privileged EXEC mode.
#telnet {<ip-address>|<host>}
This command Telnet to a specified IP address or host name. To use the host name, you must be able to resolve the name by setting the ip host command or DNS.
You can omit the “telnet” command itself. In other words, if you enter an IP address or host name and press the “Enter” key, Telnet to the specified IP address or host name.
Here’s something to keep in mind. If you enter the wrong command, it will interpret the command as a hostname and try to resolve the name in order to telnet.
Router#aaa
Translating "aaa"...domain server (255.255.255.255)
 (255.255.255.255)
Translating "aaa"...domain server (255.255.255.255)
% Unknown command or computer name, or unable to find computer address
If you enter the wrong command “aaa”, the Cisco device interprets this as “Telnet to the host name “aaa””, and by default it will try to broadcast to perform name resolution for “aaa”. This action will cause the configuration process to be interrupted. To prevent this, enter the following command in global configuration mode
(config)#no ip domain-lookup
Router#configure terminal
Enter configuration commands, one per line.  End with CNTL/Z.
Router(config)#no ip domain-lookup
Router(config)#end
Router#aaa
Translating "aaa"

Translating "aaa"
% Unknown command or computer name, or unable to find computer address
If you enter the wrong command, no name resolution is performed and no time is lost. It is recommended that you include no ip domain-lookup during the configuration process.
Run SSH from Cisco router and Catalyst switch
Cisco routers and Catalyst switches can also provide VTY access to other devices as an SSH client. use the following commands in user EXEC or privileged EXEC mode to remotely log in to other devices as an SSH client.
#ssh -l <user> {<ip-address|host-name>}
This command will try to log in to the specified IP address or host with the specified user name. If you want to use the host name, you need to be able to resolve the name as well as the telnet command.
R2#ssh -l cisco 192.168.1.1

Password:

R1>
Enable log output for remote login destination (terminal monitor)
When you remotely log in to a Cisco router or Catalyst switch via Telnet/SSH, no logs are output by default. If you want to output the log of the remote login destination, enter the terminal monitor command in privileged EXEC mode.
#terminal monitor
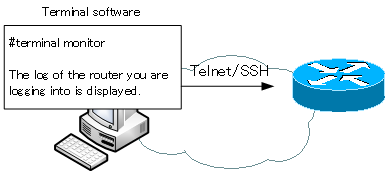
Example of terminal monitor
The following is an example of the terminal monitor command. The following log output is obtained by telnetting from the console of R1 to R2, and if the terminal monitor command is not set up, the log will not be output even after exiting the global configuration mode at the R2 destination.
R1#telnet 192.168.12.2
Trying 192.168.12.2 ... Open


User Access Verification

Password:
R2>enable
Password:
R2#conf t
Enter configuration commands, one per line.  End with CNTL/Z.
R2(config)#exit
R2#
When you exit global configuration mode after entering the terminal monitor command from privileged EXEC mode in R2, the log is displayed. Of course, the log is also displayed except when exiting the global configuration mode.
R2#terminal monitor
R2#conf t
Enter configuration commands, one per line.  End with CNTL/Z.
R2(config)#exit
R2#
*Mar  1 00:04:42.735: %SYS-5-CONFIG_I: Configured from console by vty0 (192.168.12.1)
R2#
How to suspend and resume VTY access
Suppose you have a VTY access from one Cisco device to another. when you have a VTY access, you become the CLI of the device to which you are accessing the VTY, and you can change configuration and execute show commands from the CLI. to abort the VTY access, you can use exit or logout You can enter a command to return to the original device’s CLI. However, this will cut off VTY access completely.
R1>exit

[Connection to 10.1.1.1 closed by foreign host]
Switch>
To suspend VTY access, press [Ctrl+Shift+6] and then press [x].
R1>[Ctrl+Shift+6] x
Switch#
If you suspend a VTY access, use the show session command to show the VTY access you are keeping.
Switch#show session
Conn Host                Address             Byte  Idle Conn Name
*  1 10.1.1.1            10.1.1.1               0     2 10.1.1.1
The “*” indicates the last VTY access. The number after it is the session number. To resume a retained VTY access, use the resume command.
#resume <session-number>
When resuming, the resume command itself can be skipped. A session can be resumed if only the session number is specified. If you omit the session number, the session marked with an asterisk (*) is restarted. In other words, if you interrupt a session and come back to the original CLI, typing key without typing anything will return you to the previous session.
Switch#[Resuming connection 1 to 10.1.1.1 ... ] R1>
If you want to disconnect the VTY access you are holding, enter the following command.
#disconnect <session-number>
Verify VTY access
The following are the main commands to verify VTY access.
- show users
- show session
show users shows the VTY accesses to you. And show session shows the VTY accesses that you are making. Let’s look at the show users and show session in the following example network
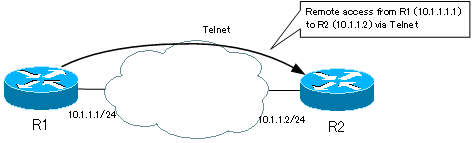
First, if we look at the show users in R2, it looks like this
R2>show user
    Line       User       Host(s)              Idle       Location
*  0 con 0                idle                 00:00:00
  18 vty 0                idle                 00:00:03 10.1.1.1
This shows that R2 is telnetted from R1 (10.1.1.1). The “18” in “18 vty 0” is the overall line number, including the console, etc. The VTY line number is “0” in this example. If you want to force a telnet disconnect for yourself, use the clear line command. If you want to disconnect the Telnet connection in this example, use the VTY line number of the show users and enter the following
#clear line 18
You can then force a telnet disconnect from R1 to R2.
Next, if we look at the show session in R1, it looks like this
R1#show session
Conn Host                Address             Byte  Idle Conn Name
*  1 10.1.1.2            10.1.1.2               0     0 10.1.1.2
R1 is telnetting to 10.1.1.2 (R2) and its session number is 1.
Cisco Basic
- Preparing for Cisco devices configuration
- Configuration files for Cisco devices
- The configuration steps for Cisco devices
- Basic knowledge of the Cisco CLI: Command types and modes
- Cisco device’s interface
- CLI help and completion
- The main error messages in CLI
- Cisco Deleting a configuration command
- default interface command -Initialize the interface settings-
- Entering commands in batches
- do command – Execute EXEC command from configuration mode –
- interface range command -Batch configuration of multiple interfaces-
- Filtering the display of the show command – displaying only the information you want to see –
- Cisco IOS Name Resolution Configuration
- terminal length command : configuration of the number of lines displayed in the command output
- debug command to verify real-time operation
- Automatically enter privileged EXEC mode upon CLI login
- Configure System Clock
- Saving and managing configuration files
- Version Management of Configuration Files ~archive command
- IOS File System Operations
- Managing Cisco Catalyst Switches :What it means to set an IP address on a switch.
- Remote management by VTY access (Telnet/SSH)
- terminal monitor command to display the log of Telnet/SSH login destination
- Multi-step Telnet Session Suspensions
- Set the minimum number of characters in the password [Cisco]
- Restrict login attempts : login block-for command
- Cisco Initial Configuration Example
- CDP – What are the connected devices? –
- Password recovery for Cisco routers
- Password Recovery for Catalyst Switches