IPv6の基本的な設定
目次
ネットワーク構成
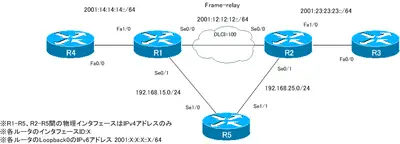
図 IPv6の基本設定 ネットワーク構成
設定条件
- 各ルータのインタフェースにIPv6アドレスを設定してください。ただし、R3のFa0/0には明示的にIPv6アドレスを設定してはいけません。また、IPv4アドレスはネットワーク構成図に記されているもの以外、設定してはいけません。
- 各ルータには、FE80::X(X:ルータ番号)リンクローカルアドレスを明示的に設定してください。
- RIPngを利用してIPv6のルーティングができるようにしてください。
- R5のLoopback0も含めてすべてのIPv6インタフェースのIPv6アドレスに対する接続性を確保できるようにしてください。そのために、必要ならばR1-R5間、R2-R5間でトンネルインタフェースを作成してください。なお、トンネルインタフェースには他のインタフェースと同様にIPv6アドレスを設定してください。
初期設定
以下の内容は設定済みです。
- ホスト名
- フレームリレー
R1/R2 Se0/0でフレームリレーのカプセル化のみ設定 - IPv4アドレス
R1-R5間
R2-R5間
設定と確認
【Step1:IPv6グローバルアドレスの設定】
各ルータでIPv6ユニキャストルーティングを有効化し、インタフェースにIPv6グローバルアドレスを設定します。R3のFa0/0には、明示的にipv6 address autoconfigコマンドでRAメッセージをもとにIPv6アドレスを設定します。
R1
-------------------------------------
ipv6 unicast-routing
!
interface Loopback0
ipv6 address 2001:1:1:1::1/64
!
interface Serial0/0
ipv6 address 2001:12:12:12::1/64
!
interface FastEthernet1/0
ipv6 address 2001:14:14:14::1/64
-------------------------------------
R2
-------------------------------------
ipv6 unicast-routing
!
interface Loopback0
ipv6 address 2001:2:2:2::2/64
!
interface Serial0/0
ipv6 address 2001:12:12:12::2/64
!
interface FastEthernet1/0
ipv6 address 2001:23:23:23::2/64
-------------------------------------
R3
-------------------------------------
ipv6 unicast-routing
!
interface Loopback0
ipv6 address 2001:3:3:3::3/64
!
interface FastEthernet0/0
ipv6 address autoconfig
-------------------------------------
R4
-------------------------------------
ipv6 unicast-routing
!
interface Loopback0
ipv6 address 2001:4:4:4::4/64
!
interface FastEthernet0/0
ipv6 address 2001:14:14:14::4/64
-------------------------------------
R5
-------------------------------------
ipv6 unicast-routing
!
interface Loopback0
ipv6 address 2001:5:5:5::5/64
-------------------------------------
【Step2:IPv6グローバルアドレスの確認】
show ipv6 interface briefコマンドでIPv6グローバルアドレスを確認します。
R1
-------------------------------------
R1#show ipv6 interface brief | exclude admin
Serial0/0                  [up/up]
FE80::CE00:41FF:FE6C:10
2001:12:12:12::1
Serial0/1                  [up/up]
FastEthernet1/0            [up/up]
FE80::CE00:41FF:FE6C:10
2001:14:14:14::1
Loopback0                  [up/up]
FE80::CE00:41FF:FE6C:10
2001:1:1:1::1
-------------------------------------
R3
-------------------------------------
R3#show ipv6 interface brief
FastEthernet0/0            [up/up]
FE80::CE00:1EFF:FE20:0
2001:23:23:23:CE00:1EFF:FE20:0
Loopback0                  [up/up]
FE80::CE00:1EFF:FE20:0
2001:3:3:3::3
-------------------------------------
【Step3:フレームリレーマップの設定】
フレームリレーのInverse ARPはIPv6アドレスの解決ができません。フレームリレー上でIPv6パケットを転送するためには、スタティックのフレームリレーマップの設定が必要です。
R1
-------------------------------------
interface Serial0/0
frame-relay map ipv6 2001:12:12:12::2 100 broadcast
-------------------------------------
R2
-------------------------------------
interface Serial0/0
frame-relay map ipv6 2001:12:12:12::1 100 broadcast
-------------------------------------
【Step4:フレームリレーマップの確認】
show frame-relay mapコマンドでIPv6グローバルアドレスに対するフレームリレーマップを確認します。
R1
-------------------------------------
R1#show frame-relay map
Serial0/0 (up): ipv6 2001:12:12:12::2 dlci 100(0x64,0x1840), static,
broadcast,
CISCO, status defined, active
R1#ping 2001:12:12:12::2
Type escape sequence to abort.
Sending 5, 100-byte ICMP Echos to 2001:12:12:12::2, timeout is 2 seconds:
!!!!!
Success rate is 100 percent (5/5), round-trip min/avg/max = 20/22/28 ms
-------------------------------------
【Step5:リンクローカルアドレスの設定】
各ルータのインタフェースにリンクローカルアドレスとして、FE80::X(X:ルータ番号)を設定します。なお、Loopback0インタフェースでは特にリンクローカルアドレスを利用することはありませんが、他のインタフェースと同じアドレスに設定しています。
R1
-------------------------------------
interface Loopback0
ipv6 address fe80::1 link-local
!
interface Serial0/0
ipv6 address fe80::1 link-local
!
interface FastEthernet1/0
ipv6 address fe80::1 link-local
-------------------------------------
R2
-------------------------------------
interface Loopback0
ipv6 address fe80::2 link-local
!
interface Serial0/0
ipv6 address fe80::2 link-local
!
interface FastEthernet1/0
ipv6 address fe80::2 link-local
-------------------------------------
R3
-------------------------------------
interface Loopback0
ipv6 address fe80::3 link-local
!
interface FastEthernet0/0
ipv6 address fe80::3 link-local
-------------------------------------
R4
-------------------------------------
interface Loopback0
ipv6 address fe80::4 link-local
!
interface FastEthernet0/0
ipv6 address fe80::4 link-local
-------------------------------------
R5
-------------------------------------
interface Loopback0
ipv6 address fe80::5 link-local
-------------------------------------
【Step6:リンクローカルアドレスの確認】
show ipv6 interface briefコマンドで設定したリンクローカルアドレスを確認します。
R1
-------------------------------------
R1#show ipv6 interface brief
Serial0/0                  [up/up]
FE80::1
2001:12:12:12::1
Serial0/1                  [up/up]
Serial0/2                  [administratively down/down]
Serial0/3                  [administratively down/down]
FastEthernet1/0            [up/up]
FE80::1
2001:14:14:14::1
Loopback0                  [up/up]
FE80::1
2001:1:1:1::1
-------------------------------------
R3
-------------------------------------
R3#show ipv6 interface brief
FastEthernet0/0            [up/up]
FE80::3
2001:23:23:23::3
Loopback0                  [up/up]
FE80::3
2001:3:3:3::3
-------------------------------------
【Step7:RIPngの設定】
各ルータでRIPngを有効にします。ここでは、タグとして「RIP」を利用しています。なお、R5ではLoopback0のみでRIPngを有効にします。
R1
-------------------------------------
interface Loopback0
ipv6 rip RIP enable
!
interface Serial0/0
ipv6 rip RIP enable
!
interface FastEthernet1/0
ipv6 rip RIP enable
!
ipv6 router rip RIP
-------------------------------------
R2
-------------------------------------
interface Loopback0
ipv6 rip RIP enable
!
interface Serial0/0
ipv6 rip RIP enable
!
interface FastEthernet1/0
ipv6 rip RIP enable
!
ipv6 router rip RIP
-------------------------------------
R3
-------------------------------------
interface Loopback0
ipv6 rip RIP enable
!
interface FastEthernet0/0
ipv6 rip RIP enable
!
ipv6 router rip RIP
-------------------------------------
R4
-------------------------------------
interface Loopback0
ipv6 rip RIP enable
!
interface FastEthernet0/0
ipv6 rip RIP enable
!
ipv6 router rip RIP
-------------------------------------
R5
-------------------------------------
interface Loopback0
ipv6 rip RIP enable
!
ipv6 router rip RIP
-------------------------------------
【Step8:RIPngの確認】
RIPngでIPv6ルートを学習できていることを確認します。そのために、以下のコマンドを利用します。
- show ipv6 protocols
- show ipv6 rip database
- show ipv6 route rip
R1
-------------------------------------
R1#show ipv6 protocols
IPv6 Routing Protocol is "connected"
IPv6 Routing Protocol is "static"
IPv6 Routing Protocol is "rip RIP"
Interfaces:
FastEthernet1/0
Serial0/0
Loopback0
Redistribution:
None
R1#show ipv6 rip database
RIP process "RIP", local RIB
2001:2:2:2::/64, metric 2, installed
Serial0/0/FE80::2, expires in 157 secs
2001:3:3:3::/64, metric 3, installed
Serial0/0/FE80::2, expires in 157 secs
2001:4:4:4::/64, metric 2, installed
FastEthernet1/0/FE80::4, expires in 170 secs
2001:12:12:12::/64, metric 2
Serial0/0/FE80::2, expires in 157 secs
2001:14:14:14::/64, metric 2
FastEthernet1/0/FE80::4, expires in 170 secs
2001:23:23:23::/64, metric 2, installed
Serial0/0/FE80::2, expires in 157 secs
R1#show ipv6 route rip
IPv6 Routing Table - 12 entries
Codes: C - Connected, L - Local, S - Static, R - RIP, B - BGP
U - Per-user Static route
I1 - ISIS L1, I2 - ISIS L2, IA - ISIS interarea, IS - ISIS summary
O - OSPF intra, OI - OSPF inter, OE1 - OSPF ext 1, OE2 - OSPF ext 2
ON1 - OSPF NSSA ext 1, ON2 - OSPF NSSA ext 2
R   2001:2:2:2::/64 [120/2]
via FE80::2, Serial0/0
R   2001:3:3:3::/64 [120/3]
via FE80::2, Serial0/0
R   2001:4:4:4::/64 [120/2]
via FE80::4, FastEthernet1/0
R   2001:23:23:23::/64 [120/2]
via FE80::2, Serial0/0
-------------------------------------
【Step9:リンクローカルアドレスに対するフレームリレーマップの設定】
IPv6では、ネクストホップとして基本的にリンクローカルアドレスを利用します。そのため、フレームリレー上にパケットをルーティングするためには、ネクストホップであるリンクローカルアドレスに対するフレームリレーマップも必要です。現在は、グローバルアドレスに対するフレームリレーマップしかありません。そのため、R1-R2間のフレームリレー経由の通信ができません。
R1
-------------------------------------
R1#ping 2001:2:2:2::2
Type escape sequence to abort.
Sending 5, 100-byte ICMP Echos to 2001:2:2:2::2, timeout is 2 seconds:
.....
Success rate is 0 percent (0/5)
-------------------------------------
フレームリレー経由での通信ができるように、R1とR2でお互いのリンクローカルアドレスに対するフレームリレーマップも設定します。
R1
-------------------------------------
interface Serial0/0
frame-relay map ipv6 FE80::2 100
-------------------------------------
R2
-------------------------------------
interface Serial0/0
frame-relay map ipv6 FE80::1 100
-------------------------------------
【Step10:リンクローカルアドレスに対するフレームリレーマップの確認】
show frame-relay mapコマンドでリンクローカルアドレスに対するフレームリレーが正しく設定されていることを確認します。また、フレームリレー上での通信ができることを確認します。
R1
-------------------------------------
R1#show frame-relay map
Serial0/0 (up): ipv6 FE80::2 dlci 100(0x64,0x1840), static,
CISCO, status defined, active
Serial0/0 (up): ipv6 2001:12:12:12::2 dlci 100(0x64,0x1840), static,
broadcast,
CISCO, status defined, active
R1#ping 2001:2:2:2::2
Type escape sequence to abort.
Sending 5, 100-byte ICMP Echos to 2001:2:2:2::2, timeout is 2 seconds:
!!!!!
Success rate is 100 percent (5/5), round-trip min/avg/max = 20/23/36 ms
-------------------------------------
【Step11:トンネルインタフェースの作成】
R1-R5間、R2-R5間はIPv4アドレスのみなので、R5 Loopback0は孤立したIPv6ネットワークです。IPv4ネットワーク上でIPv6の通信を行うために、R1-R5間、R2-R5間でトンネルインタフェースを作成します。
トンネルインタフェース上でIPv6パケットを扱えるようにするためには、IPv6アドレスの設定が必要です。他のプレフィクスと同様にIPv6アドレスを設定します。さらに、トンネルインタフェース上でRIPngも有効化します。
R1
-------------------------------------
interface Tunnel15
ipv6 address 2001:15:15:15::1/64
ipv6 rip RIP enable
tunnel source Serial0/1
tunnel destination 192.168.15.5
tunnel mode ipv6ip
-------------------------------------
R2
-------------------------------------
interface Tunnel25
ipv6 address 2001:25:25:25::2/64
ipv6 rip RIP enable
tunnel source Serial0/1
tunnel destination 192.168.25.5
tunnel mode ipv6ip
-------------------------------------
R5
-------------------------------------
interface Tunnel15
ipv6 address 2001:15:15:15::5/64
ipv6 rip RIP enable
tunnel source Serial0/0
tunnel destination 192.168.15.1
tunnel mode ipv6ip
!
interface Tunnel25
ipv6 address 2001:25:25:25::5/64
ipv6 rip RIP enable
tunnel source Serial0/1
tunnel destination 192.168.25.2
tunnel mode ipv6ip
-------------------------------------
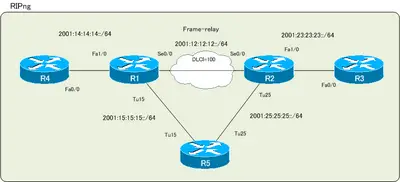
図 トンネルインタフェースの作成
【Step12:トンネルインタフェースの確認】
Step11で作成したトンネルインタフェースを確認します。トンネルインタフェースでは、リンクローカルアドレスとしてFE80::
R1
-------------------------------------
R1#show ipv6 interface tunnel 15
Tunnel15 is up, line protocol is up
IPv6 is enabled, link-local address is FE80::C0A8:F01
Global unicast address(es):
2001:15:15:15::1, subnet is 2001:15:15:15::/64
Joined group address(es):
FF02::1
FF02::2
FF02::9
FF02::1:FF00:1
FF02::1:FFA8:F01
MTU is 1480 bytes
ICMP error messages limited to one every 100 milliseconds
ICMP redirects are enabled
ND DAD is enabled, number of DAD attempts: 1
ND reachable time is 30000 milliseconds
Hosts use stateless autoconfig for addresses.
R1#show ipv6 protocols
IPv6 Routing Protocol is "connected"
IPv6 Routing Protocol is "static"
IPv6 Routing Protocol is "rip RIP"
Interfaces:
Tunnel15
FastEthernet1/0
Serial0/0
Loopback0
Redistribution:
None
R1#show ipv6 route rip
IPv6 Routing Table - 16 entries
Codes: C - Connected, L - Local, S - Static, R - RIP, B - BGP
U - Per-user Static route
I1 - ISIS L1, I2 - ISIS L2, IA - ISIS interarea, IS - ISIS summary
O - OSPF intra, OI - OSPF inter, OE1 - OSPF ext 1, OE2 - OSPF ext 2
ON1 - OSPF NSSA ext 1, ON2 - OSPF NSSA ext 2
R   2001:2:2:2::/64 [120/2]
via FE80::2, Serial0/0
R   2001:3:3:3::/64 [120/3]
via FE80::2, Serial0/0
R   2001:4:4:4::/64 [120/2]
via FE80::4, FastEthernet1/0
R   2001:5:5:5::/64 [120/2]
via FE80::C0A8:F05, Tunnel15
R   2001:23:23:23::/64 [120/2]
via FE80::2, Serial0/0
R   2001:25:25:25::/64 [120/2]
via FE80::2, Serial0/0
via FE80::C0A8:F05, Tunnel15
-------------------------------------