Table of Contents
GNS3 requires IOS
The IOS of a real device is necessary to emulate the Cisco router with GNS3. Please download the IOS image file of the actual device to the PC that will use GNS3 in advance. The following are recommended models of Cisco routers that are easy to use with GNS3.
- Cisco3640
- Cisco3725/3745
While the latest IOS 15.x is not available for these models, you don’t need much of the latest IOS to study for the Cisco certification exam; most technologies in CCNA-CCNP as well as CCIE Routing & Switching can be adequately validated on these routers.
Outside of studying for certification, you don’t really need to use the latest IOS to understand how the basic protocols work.
Advance preparations
Here’s what you’ll need to download the IOS of the real router to your PC
- Real router
- PC(TFTP client)
- LAN cable(UTP cable)
- Console cable
Your PC will need a wired Ethernet interface. Modern PCs don’t have a serial port, so a console cable that connects directly to the USB port would be useful.
How to download IOS of the real router to your PC
The steps to download IOS of the real router to your PC are as follows
- Wiring the real router to the PC
- Configure the real router as a TFTP server
- Download IOS with your PC TFTP client
Wiring the real router to the PC
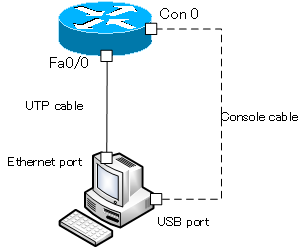
Wire the actual router and PC to which you want to download IOS. Connect the Ethernet interface of the router and PC with a UTP cable. Since you need to configure the router, you also need to connect the console.

When the Ethernet interface is not up, wire it with a cross cable. Or, connect the Ethernet interface of the router and the PC through a switching hub.
The router interface name is FastEthernet0/0 (Fa0/0) as an example. It will vary depending on the actual router.
Configure the real router as a TFTP server
Configure the real router as a TFTP server. First, set the IP address of the interface that is connected to the PC, and any value for the IP address can be used as long as it allows communication with the PC. Then, use the tftp-server command to enable TFTP download of the IOS file on the flash memory.
The following is an example command for FastEthernet0/0 with IP address 192.168.1.111/24 and the file name of the IOS image file on the flash memory is “c1841-ipbase-mz.124-12a.bin”.
interface FastEthernet0/0
 ip address 192.168.1.111 255.255.255.0
 no shutdown
!
tftp-server flash: c1841-ipbase-mz.124-12a.bin
Download IOS with your PC TFTP client
Download the IOS file from the actual router using the TFTP client on your PC. and you can install an additional TFTP client on Windows 10. Configure an IP address/subnet mask that can communicate with the router and download the IOS file from the command prompt using the tftp command.
To transfer the file “c1841-ipbase-mz.124-12a.bin” with the IP address of the TFTP server is 192.168.1.111, you need to enter the following command.
C:\Users\gene>tftp -i 192.168.1.111 get c1841-ipbase-mz.124-12a.bin
転送を正常に完了しました: 49 秒間に 15788240 バイト、322208 バイト/秒
The downloaded file is stored in the current directory of the command’s prompt.
How to use GNS3
- Installation of GNS3 (Windows10)
- How to Upgrade GNS3 version
- How to download IOS of the real router to PC
- Creating IOS Router Template
- Setting up the GNS3 VM server
- What to do when GNS3 VM does not turn green in Servers Summary?
- Creating an IOS router template (VM server)
- How to Use IOU(IOS on Unix) on GNS3
- How to Use CSR1000v on GNS3
- Creating GNS3 project
- Link to Host OS
- Example of linking to the host OS
- How to add a VMware virtual machine to a GNS3 topology
- VPCS Configuration and Operation
- How to Add Docker Container Linux Hosts
- How to use FRR (Free Range Routing) container on GNS3
- How to Use GNS3 Appliances
- Managing Snapshots
- Export/Import configuration
- Packet Capture
- Edit startup-config directly
- How to change the Solar-PuTTY font and background color