目次
概要
BGPネイバーの設定は、同じようなコマンドを繰り返し設定することが多いです。ピアグループ(Peer Group)によって、ネイバーの設定のテンプレートを作成して、BGPネイバーの設定を簡素化できます。
BGPピアグループについて解説します。
BGPピアグループとは
ピアグループとは、ネイバーに関する共通の設定をまとめたテンプレートです。特にIBGPネイバーは同じような設定をネイバーのIPアドレスのみ変更して行います。フルメッシュIBGPの場合、設定しなければいけないネイバーの数が膨大になることもあるので、設定が非常に煩雑です。
そこで、ネイバーに関する共通の設定をピアグループにまとめて、ネイバーに対してピアグループを適用すると設定を簡素化することができます。また、共通のポリシーが適用されるため、ネイバーに対するBGPのルート情報をアドバタイズする際のルータの負荷も軽減することができます。
BGPピアグループのメリット
- BGPネイバーの設定を簡素化できる
- BGPネイバーへルートをアドバタイズする処理の負荷を軽減できる
ピアグループの設定
ピアグループの設定の流れ
ピアグループを利用したBGPネイバーの設定の流れは以下の通りです。
- ピアグループを定義する
- 特定のネイバーに対してピアグループを適用する
ピアグループを定義する
ネイバーに関する共通の設定をまとめたピアグループを定義します。ピアグループの定義は、BGPのコンフィグレーションモードで次のコマンドを入力します。
ピアグループの定義
(config)#router bgp <AS>
(config-router)#neighbor <peer-group-name> peer-group
(config-router)#neighbor <peer-group-name> <BGPネイバーの共通設定>
<AS> : AS番号
BGPネイバー共通の設定として、よくあるのは、以下のような設定です。
- remote-as
- update-source
- next-hop-self
distribute-list、filter-list、route-mapなどのポリシーもピアグループの共通設定でまとめることができます。
ネイバーごとに受信ポリシーのみ追加で設定できます。ネイバーごとの送信ポリシーの追加設定はできません。
特定のネイバーに対してピアグループを適用する
ネイバーのIPアドレスを指定して、ピアグループを適用します。ピアグループの適用は、BGPコンフィグレーションモードで次のように設定します。
ピアグループの適用
(config)#router bgp <AS>
(config-router)#neighbor <ip-address> peer-group <peer-group-name>
<AS> : AS番号
<peer-group-name> : ピアグループ名
ピアグループの設定例
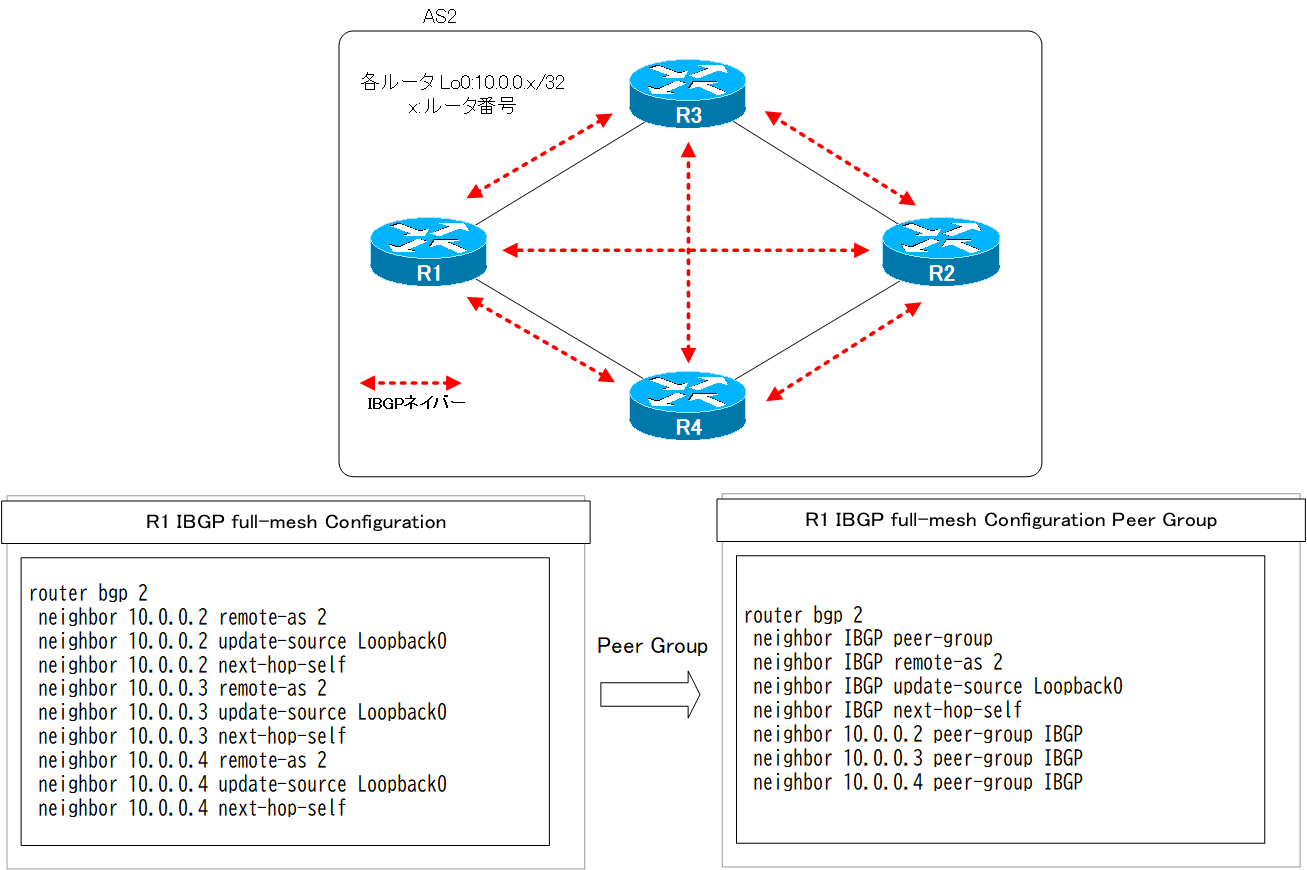
ネットワーク構成
ピアグループの設定例として、4台のBGPルータでIBGPネイバーをフルメッシュで設定します。

R1、R2が他のASと接続されるAS境界のルータです。
初期設定
AS2内はOSPFエリア0でルーティングしています。IBGPネイバーを確立するLoopback0への接続性を確保しています。
R1 Initial Configuration
hostname R1-IOU
!
interface Loopback0
 ip address 10.0.0.1 255.255.255.255
!
interface Ethernet0/0
 ip address 192.168.13.1 255.255.255.0
!
interface Ethernet0/1
 ip address 192.168.14.1 255.255.255.0
!
router ospf 1
 network 10.0.0.1 0.0.0.0 area 0
 network 192.168.0.0 0.0.255.255 area 0
R2 Initial Configuration
hostname R2-IOU
!
interface Loopback0
 ip address 10.0.0.2 255.255.255.255
!
interface Ethernet0/0
 ip address 192.168.23.2 255.255.255.0
!
interface Ethernet0/1
 ip address 192.168.24.2 255.255.255.0
!
router ospf 1
 network 10.0.0.2 0.0.0.0 area 0
 network 192.168.0.0 0.0.255.255 area 0
R3 Initial Configuration
hostname R3-IOU
!
interface Loopback0
 ip address 10.0.0.3 255.255.255.255
!
interface Ethernet0/0
 ip address 192.168.13.3 255.255.255.0
!
interface Ethernet0/1
 ip address 192.168.23.3 255.255.255.0
!
router ospf 1
 network 10.0.0.3 0.0.0.0 area 0
 network 192.168.0.0 0.0.255.255 area 0
R4 Initial Configuration
hostname R4-IOU
!
interface Loopback0
 ip address 10.0.0.4 255.255.255.255
!
interface Ethernet0/0
 ip address 192.168.14.4 255.255.255.0
!
interface Ethernet0/1
 ip address 192.168.24.4 255.255.255.0
!
router ospf 1
 network 10.0.0.4 0.0.0.0 area 0
 network 192.168.0.0 0.0.255.255 area 0
通常のフルメッシュIBGPネイバー設定
AS内にルータが4台存在するので、各ルータで3つずつのIBGPネイバーの設定を行います。設定は下記のようになります。
R1
R1 フルメッシュIBGPネイバー
router bgp 2
 neighbor 10.0.0.2 remote-as 2
 neighbor 10.0.0.2 update-source Loopback0
 neighbor 10.0.0.2 next-hop-self
 neighbor 10.0.0.3 remote-as 2
 neighbor 10.0.0.3 update-source Loopback0
 neighbor 10.0.0.3 next-hop-self
 neighbor 10.0.0.4 remote-as 2
 neighbor 10.0.0.4 update-source Loopback0
 neighbor 10.0.0.4 next-hop-self
R2
R2 フルメッシュIBGPネイバー
router bgp 2
 neighbor 10.0.0.1 remote-as 2
 neighbor 10.0.0.1 update-source Loopback0
 neighbor 10.0.0.1 next-hop-self
 neighbor 10.0.0.3 remote-as 2
 neighbor 10.0.0.3 update-source Loopback0
 neighbor 10.0.0.3 next-hop-self
 neighbor 10.0.0.4 remote-as 2
 neighbor 10.0.0.4 update-source Loopback0
 neighbor 10.0.0.4 next-hop-self
R3
R3 フルメッシュIBGPネイバー
router bgp 2
 neighbor 10.0.0.1 remote-as 2
 neighbor 10.0.0.1 update-source Loopback0
 neighbor 10.0.0.2 remote-as 2
 neighbor 10.0.0.2 update-source Loopback0
 neighbor 10.0.0.4 remote-as 2
 neighbor 10.0.0.4 update-source Loopback0
R4
R4 フルメッシュIBGPネイバー
router bgp 2
 neighbor 10.0.0.1 remote-as 2
 neighbor 10.0.0.1 update-source Loopback0
 neighbor 10.0.0.2 remote-as 2
 neighbor 10.0.0.2 update-source Loopback0
 neighbor 10.0.0.3 remote-as 2
 neighbor 10.0.0.3 update-source Loopback0
このトポロジでは、neighbor next-hop-selfはAS境界のルータで設定するIBGPネイバーに対してのみ設定します。AS内部のルータで設定するIBGPネイバーには必要ありません。
フルメッシュIBGPネイバーの設定は、ネイバーのIPアドレスを変えて同じような設定を何度も何度も繰り返し設定することがわかります。
ピアグループのフルメッシュIBGPネイバー設定
ピアグループによって、ネイバーに共通の設定をテンプレート化して、ネイバーの設定を簡素化できます。ピアグループでのフルメッシュIBGPネイバー設定は、以下のようになります。
R1
R1 フルメッシュIBGPネイバー ピアグループ
router bgp 2
 neighbor IBGP peer-group
 neighbor IBGP remote-as 2
 neighbor IBGP update-source Loopback0
 neighbor IBGP next-hop-self
 neighbor 10.0.0.2 peer-group IBGP
 neighbor 10.0.0.3 peer-group IBGP
 neighbor 10.0.0.4 peer-group IBGP
R2
R2 フルメッシュIBGPネイバー ピアグループ
router bgp 2
 neighbor IBGP peer-group
 neighbor IBGP remote-as 2
 neighbor IBGP update-source Loopback0
 neighbor IBGP next-hop-self
 neighbor 10.0.0.1 peer-group IBGP
 neighbor 10.0.0.3 peer-group IBGP
 neighbor 10.0.0.4 peer-group IBGP
R3
R3 フルメッシュIBGPネイバー ピアグループ
router bgp 2
 neighbor IBGP peer-group
 neighbor IBGP remote-as 2
 neighbor IBGP update-source Loopback0
 neighbor 10.0.0.1 peer-group IBGP
 neighbor 10.0.0.2 peer-group IBGP
 neighbor 10.0.0.4 peer-group IBGP
R4
R4 フルメッシュIBGPネイバー ピアグループ
router bgp 2
 neighbor IBGP peer-group
 neighbor IBGP remote-as 2
 neighbor IBGP update-source Loopback0
 neighbor 10.0.0.1 peer-group IBGP
 neighbor 10.0.0.2 peer-group IBGP
 neighbor 10.0.0.3 peer-group IBGP
ピアグループを利用で、ネイバーの設定を簡素化できることが実感できるでしょう。ネイバーの数が多くなればなるほど、ピアグループの効果は大きくなります。
まとめ
ポイント
- ピアグループとは、ネイバーに関する共通の設定をまとめたテンプレートです。
- ピアグループの主なメリットは以下の通りです。
- BGPネイバーの設定を簡素化できます。
- BGPネイバーへルートをアドバタイズする処理の負荷を軽減できます。

BGPの仕組み
- BGPの概要 ~AS間でルート情報を交換~
- BGPの動作
- BGPの基本設定と確認コマンド
- BGPピアグループ(Peer Group) ~ネイバーの設定をまとめよう~
- BGPネイバーの状態
- BGPコンフェデレーションの設定
- BGPコンフェデレーションの設定例
- BGPネイバー認証
- BGP Well Known Mandatory アトリビュート -ORIGIN/AS_PATH/NEXT_HOP-
- 図解!BGPベストパス選択アルゴリズム
- BGP 基本的な設定についての演習[Cisco]
- BGPの基本的な設定についての演習 ~トラブルシュート~
- BGP KEEPALIVEタイマ/ホールドタイムの設定
- BGPルート 最小送信間隔の設定
- BGPルートダンプニング
- マルチホーム – インターネット接続の冗長化 –
- マルチホームAS BGPルートフィルタのポイント
- マルチホームAS ベストパス選択のポイント
- マルチホームAS IGPとBGPの連携のポイント
- マルチホームAS BGPの設定例
- IP-VPNでのBGPの利用 設定例
- BGPルートフィルタの種類
- BGPルートフィルタ -ディストリビュートリスト-
- BGPルートフィルタ -ディストリビュートリスト設定例-
- BGPルートフィルタ -プレフィクスリスト-
- BGPルートフィルタ -プレフィクスリスト設定例-
- BGPルートフィルタ -フィルタリスト(AS_PATH ACL)-
- BGPルートフィルタ -フィルタリスト(AS_PATH ACL)設定例-
- BGPルートフィルタ -ルートマップ(route-map)-
- BGPルートフィルタ -ルートマップ(route-map)設定例-
- BGP neighbor allowas-inコマンド
- BGP neighbor as-overrideコマンド
- BGPルート RIB Failure
- BGPルート アドミニストレイティブディスタンスの制御
- BGPルートの負荷分散
- BGPルート 条件付き生成
- BGPルート 条件付きアドバタイズ
- BGP ルート集約 自動集約
- BGPルート集約 networkコマンドによる集約
- BGPルート集約 networkコマンドによる集約 設定例
- BGP ルート集約 aggregate-addressコマンドによる集約
- aggregate-addressコマンドのオプション summary-only
- aggregate-addressコマンドのオプション attribute-map
- aggregate-addressコマンドのオプション as-set
- aggregate-addressコマンドのオプション advertise-map
- aggregate-addressコマンド as-set/attribute-map/advertise-map 設定例
- BGP選択型集約の概要
- BGP選択型集約 suppress-map
- BGP選択型集約 unsuppress-map
- BGP 選択型集約 suppress-map/unsuppress-map 設定例
- BGP local-as ~ネイバーに他のASのように見せる~
- BGP neighbor remove-private-ASコマンド
- bgp fast external-fallover
- BGP プレフィクス数の制限
- BGP COMMUNITYアトリビュートの使い方
- BGP Well-known COMMUNITYのルートフィルタ設定例
- BGP プライベートCOMMUNITYによるルート制御の設定例
- [演習]BGP応用 Part1:BGP基本設定
- [演習]BGP応用 Part2:ルート集約
- [演習]BGP応用 Part3:ポリシーベースルーティング
- [演習]BGP応用 Part4:トラブルシューティング
- BGP 設定ミスの切り分けと修正 Part1
- BGP 設定ミスの切り分けと修正 Part2
- BGP 設定ミスの切り分けと修正 Part3
- BGP 設定ミスの切り分けと修正 Part4
- BGP 設定ミスの切り分けと修正 Part5
- BGP 設定ミスの切り分けと修正 Part6
- BGP 設定ミスの切り分けと修正 Part7
- IPv6 BGPの設定例 Part1
- IPv6 BGPの設定例 Part2
- 2021年10月4日 Facebookに何が起こったか?
- IPv4 BGPネイバーでのIPv6プレフィックスの交換